
Accessing Google's LLM Gemini Pro
Recently Google announced the publication of the LLM Gemini Pro, which outperformed GPT-3.5 in six out of eight benchmarks. In this post I describe several ways to access the model.


gs://generativeai-downloads/images/scones.jpgIntroduction
Recently, Google introduced its latest large language model, Gemini Pro, which has garnered significant attention for its impressive performance surpassing GPT-3.5 in several benchmarks.
While there is an easily accessible Gemini web app, this post looks at different approaches to accessing and using this powerful AI tool. The Gemini Pro API is readily accessible on Google Cloud, offering users a comprehensive suite of capabilities. To embark on this journey, certain prerequisites are essential, including establishing a billing account, creating a project, and activating the Vertex AI API1.
Google has introduced Gemini 1.5, a next-generation AI model, which delivers enhanced performance and a significant breakthrough in understanding long-context across different modalities. This model builds upon the foundations of Gemini 1.0, offering improvements in efficiency and the ability to process up to 1 million tokens, showcasing the longest context window among large-scale foundation models. Gemini 1.5 Pro, a version optimized for a broad range of tasks, is available for early testing and showcases capabilities in complex reasoning, multimodal understanding, and advanced problem-solving. For more details, you can read the full announcement on Google's blog.
Once these steps are completed, several avenues open up to explore the Gemini Pro API:
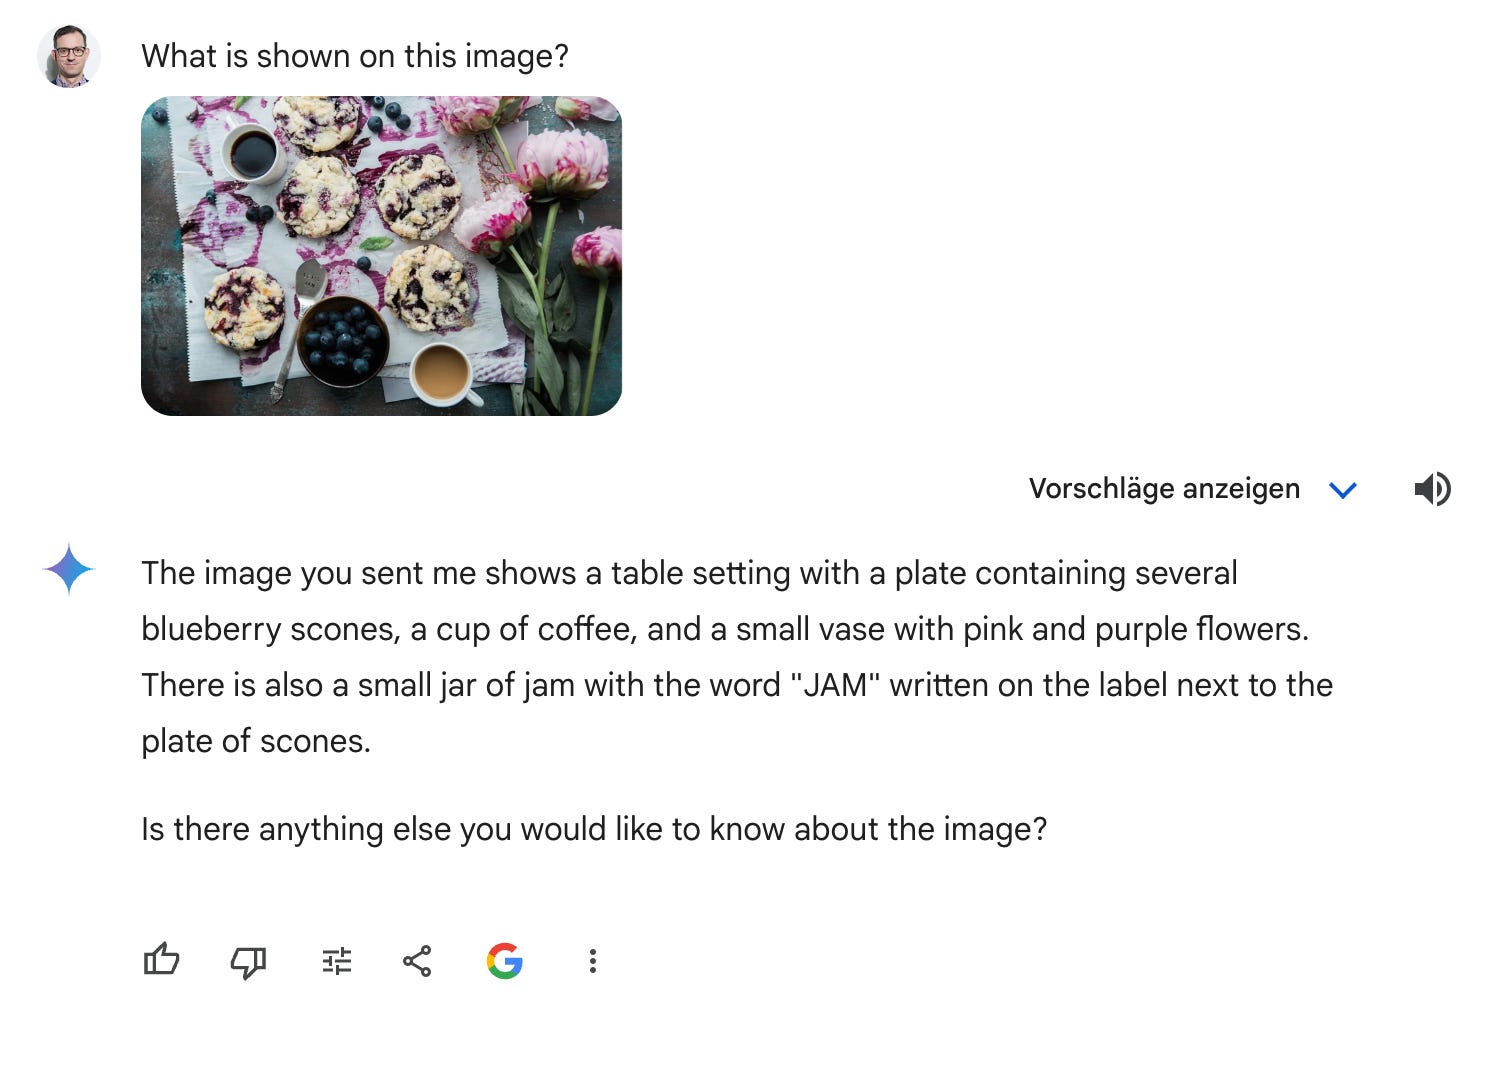
Gemini Webapp,
Vertex AI console,
Cloud Shell API calls,
Google Colab API calls,
and local computer API calls.
Each method provides a unique interface to harness the capabilities of this cutting-edge language model.
Gemini Webapp
The Gemini webapp is designed to showcase the capabilities of the Gemini AI model. It allows users to interact with Gemini's advanced features, including handling complex queries, understanding and generating content across different modalities, and demonstrating its efficiency in real-time applications. The webapp serves as a platform for both developers and general users to experience the model's improvements firsthand and explore its potential applications in various fields.
Warning: Before delving into more complex methods, it's crucial to acknowledge their heightened complexity, requiring proficiency in Google Cloud and fundamental programming skills. Additionally, these approaches necessitate a Google Cloud project, and usage may incur associated costs. Therefore, it's recommended to assess one's technical expertise and project requirements before embarking on these advanced techniques.
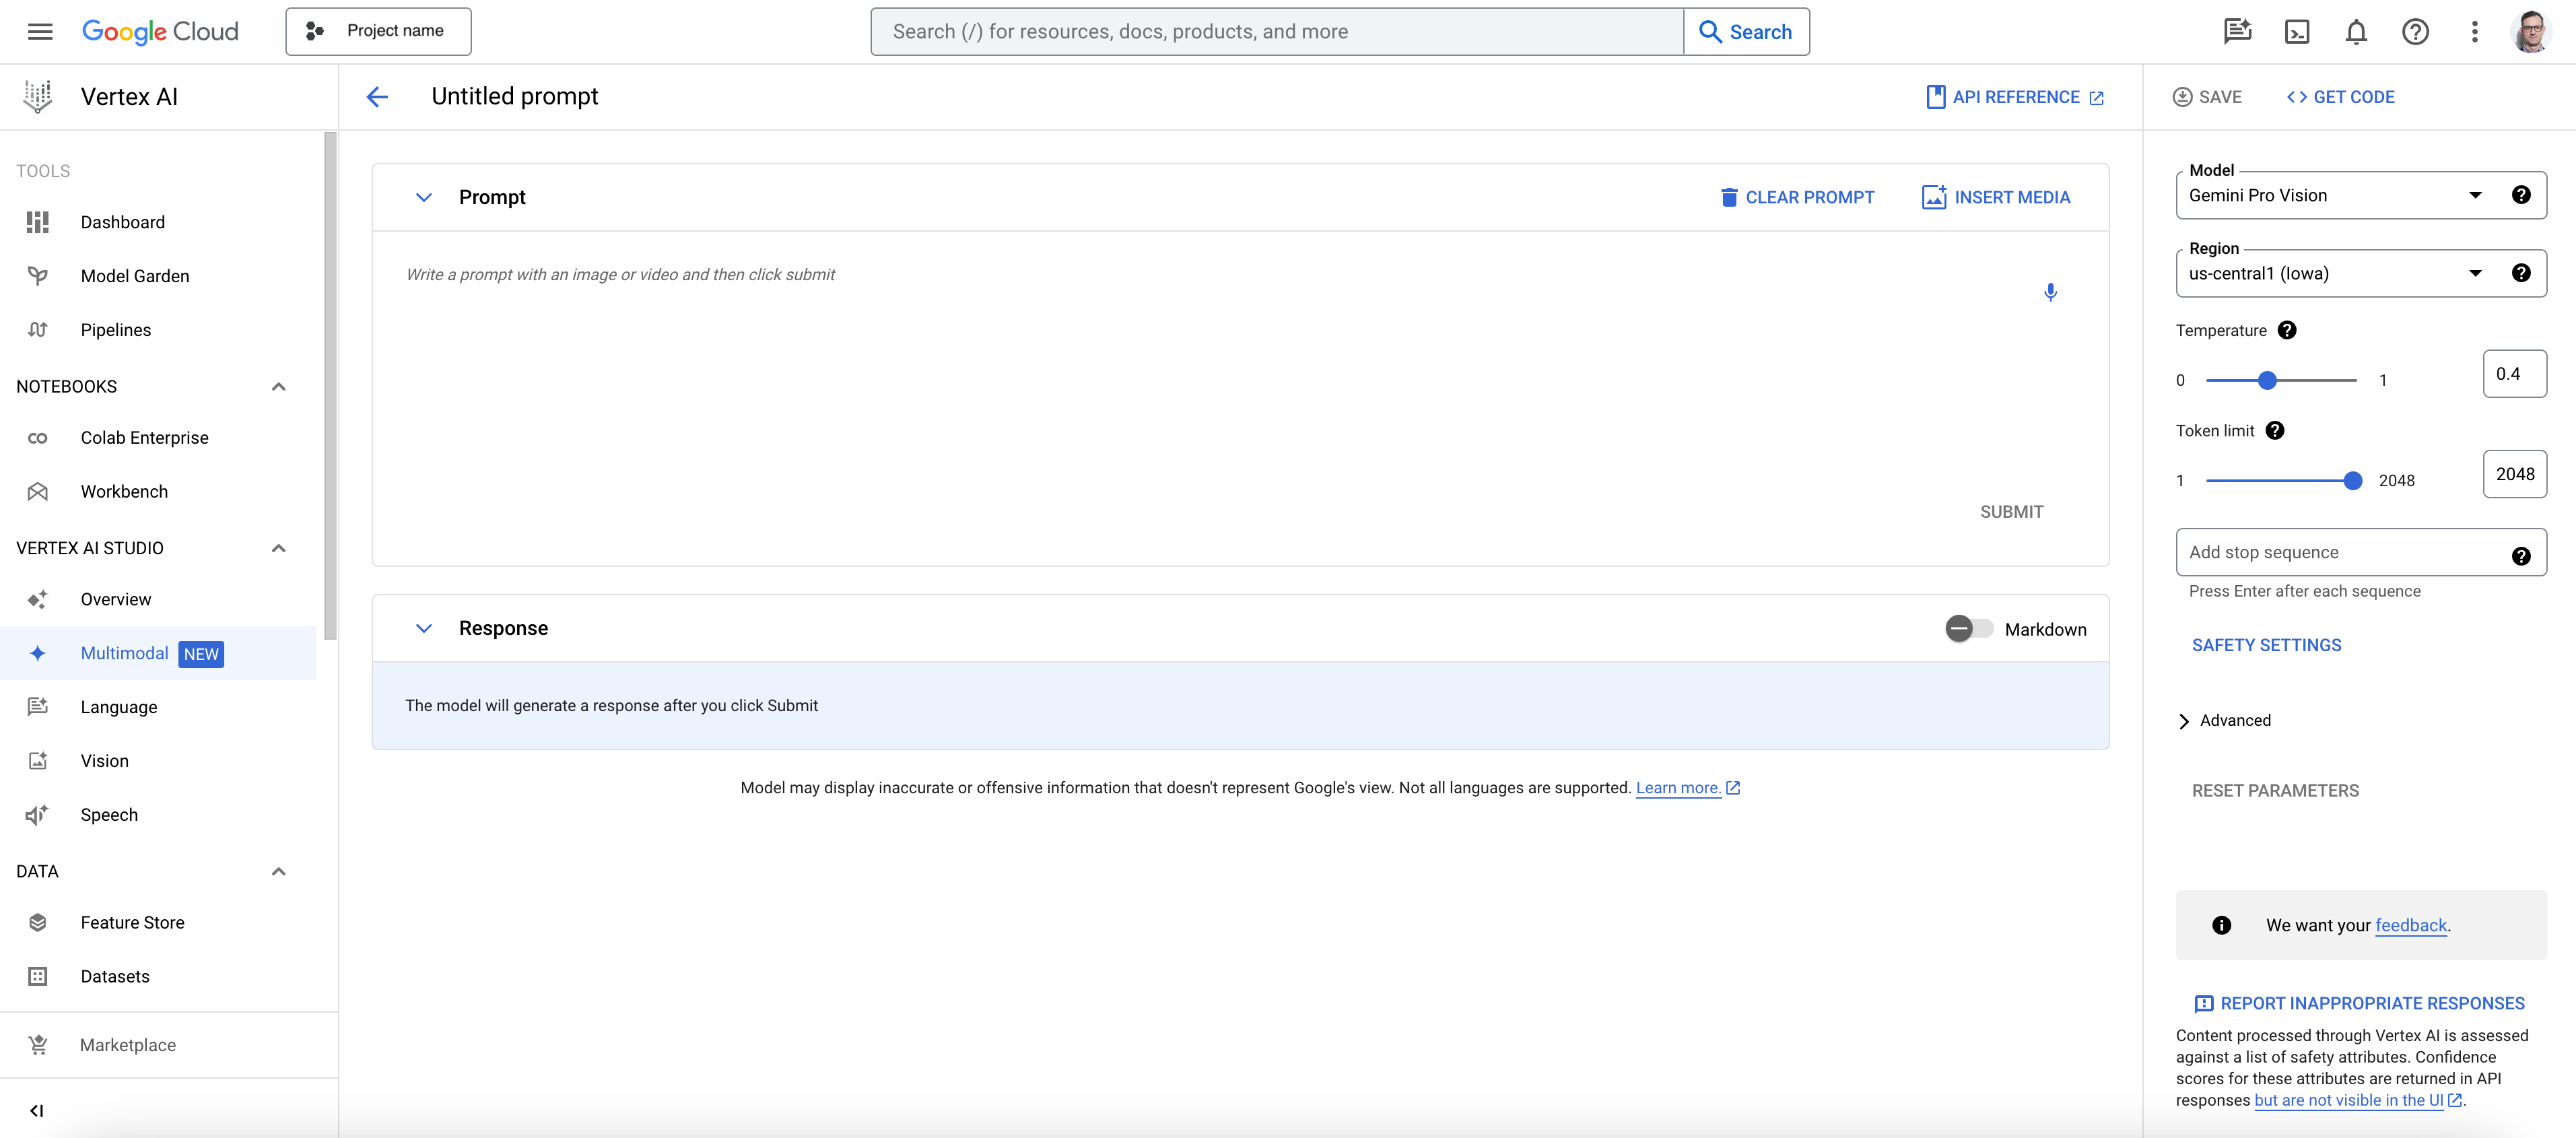
Vertex AI console
The Vertex AI console provides easy access to Gemini Pro in Google Cloud with more control options than the web app. The description says:
“Test the Gemini model using natural language, code, and an image. Single-turn prompting has no conversation history.”
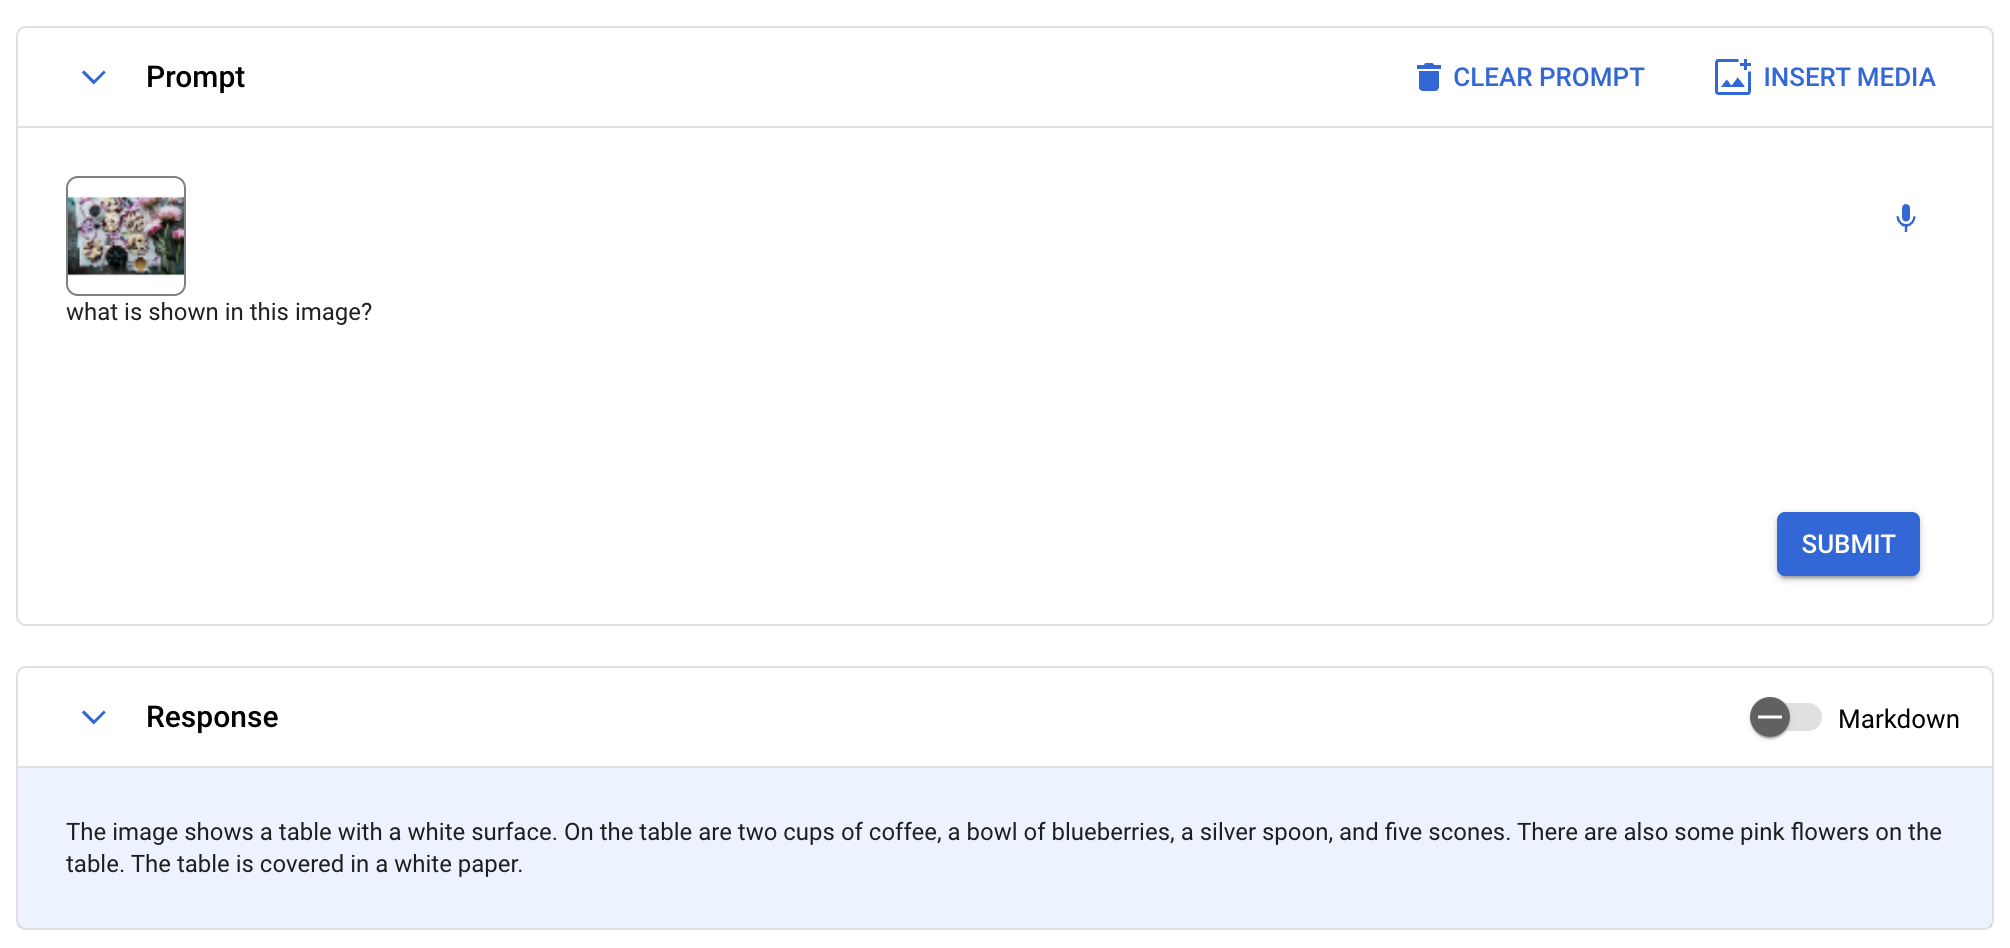
Log into Google cloud and navigate with the Navigation menu to Vertex AI and click on Multimodal in section Vertex AI Studio2. Click the open button in the panel titled “Prompt design (single turn)”.
After uploading an image3 you can submit the image with a prompt to get a response:
API call from cloud shell
I followed the instructions provided here to access the Gemini Pro API using the SDK for Python4. Make sure to set up Google Cloud, create a project and activate the Vertex AI API, if necessary (see here for details).
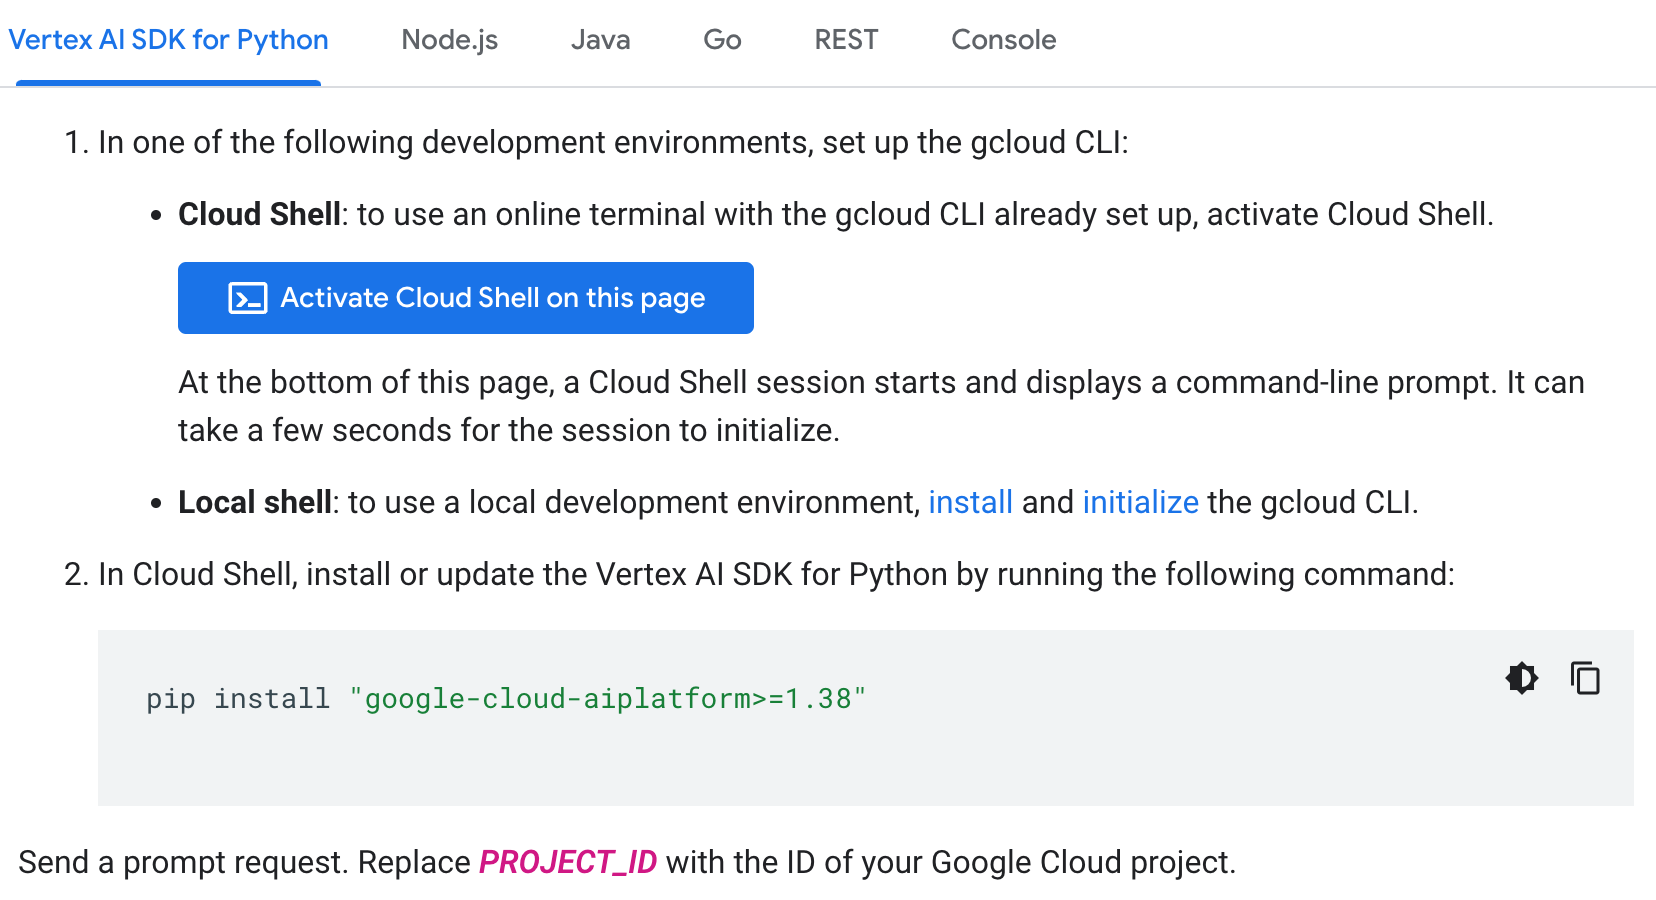
Click on “Activate Cloud Shell in this page”.
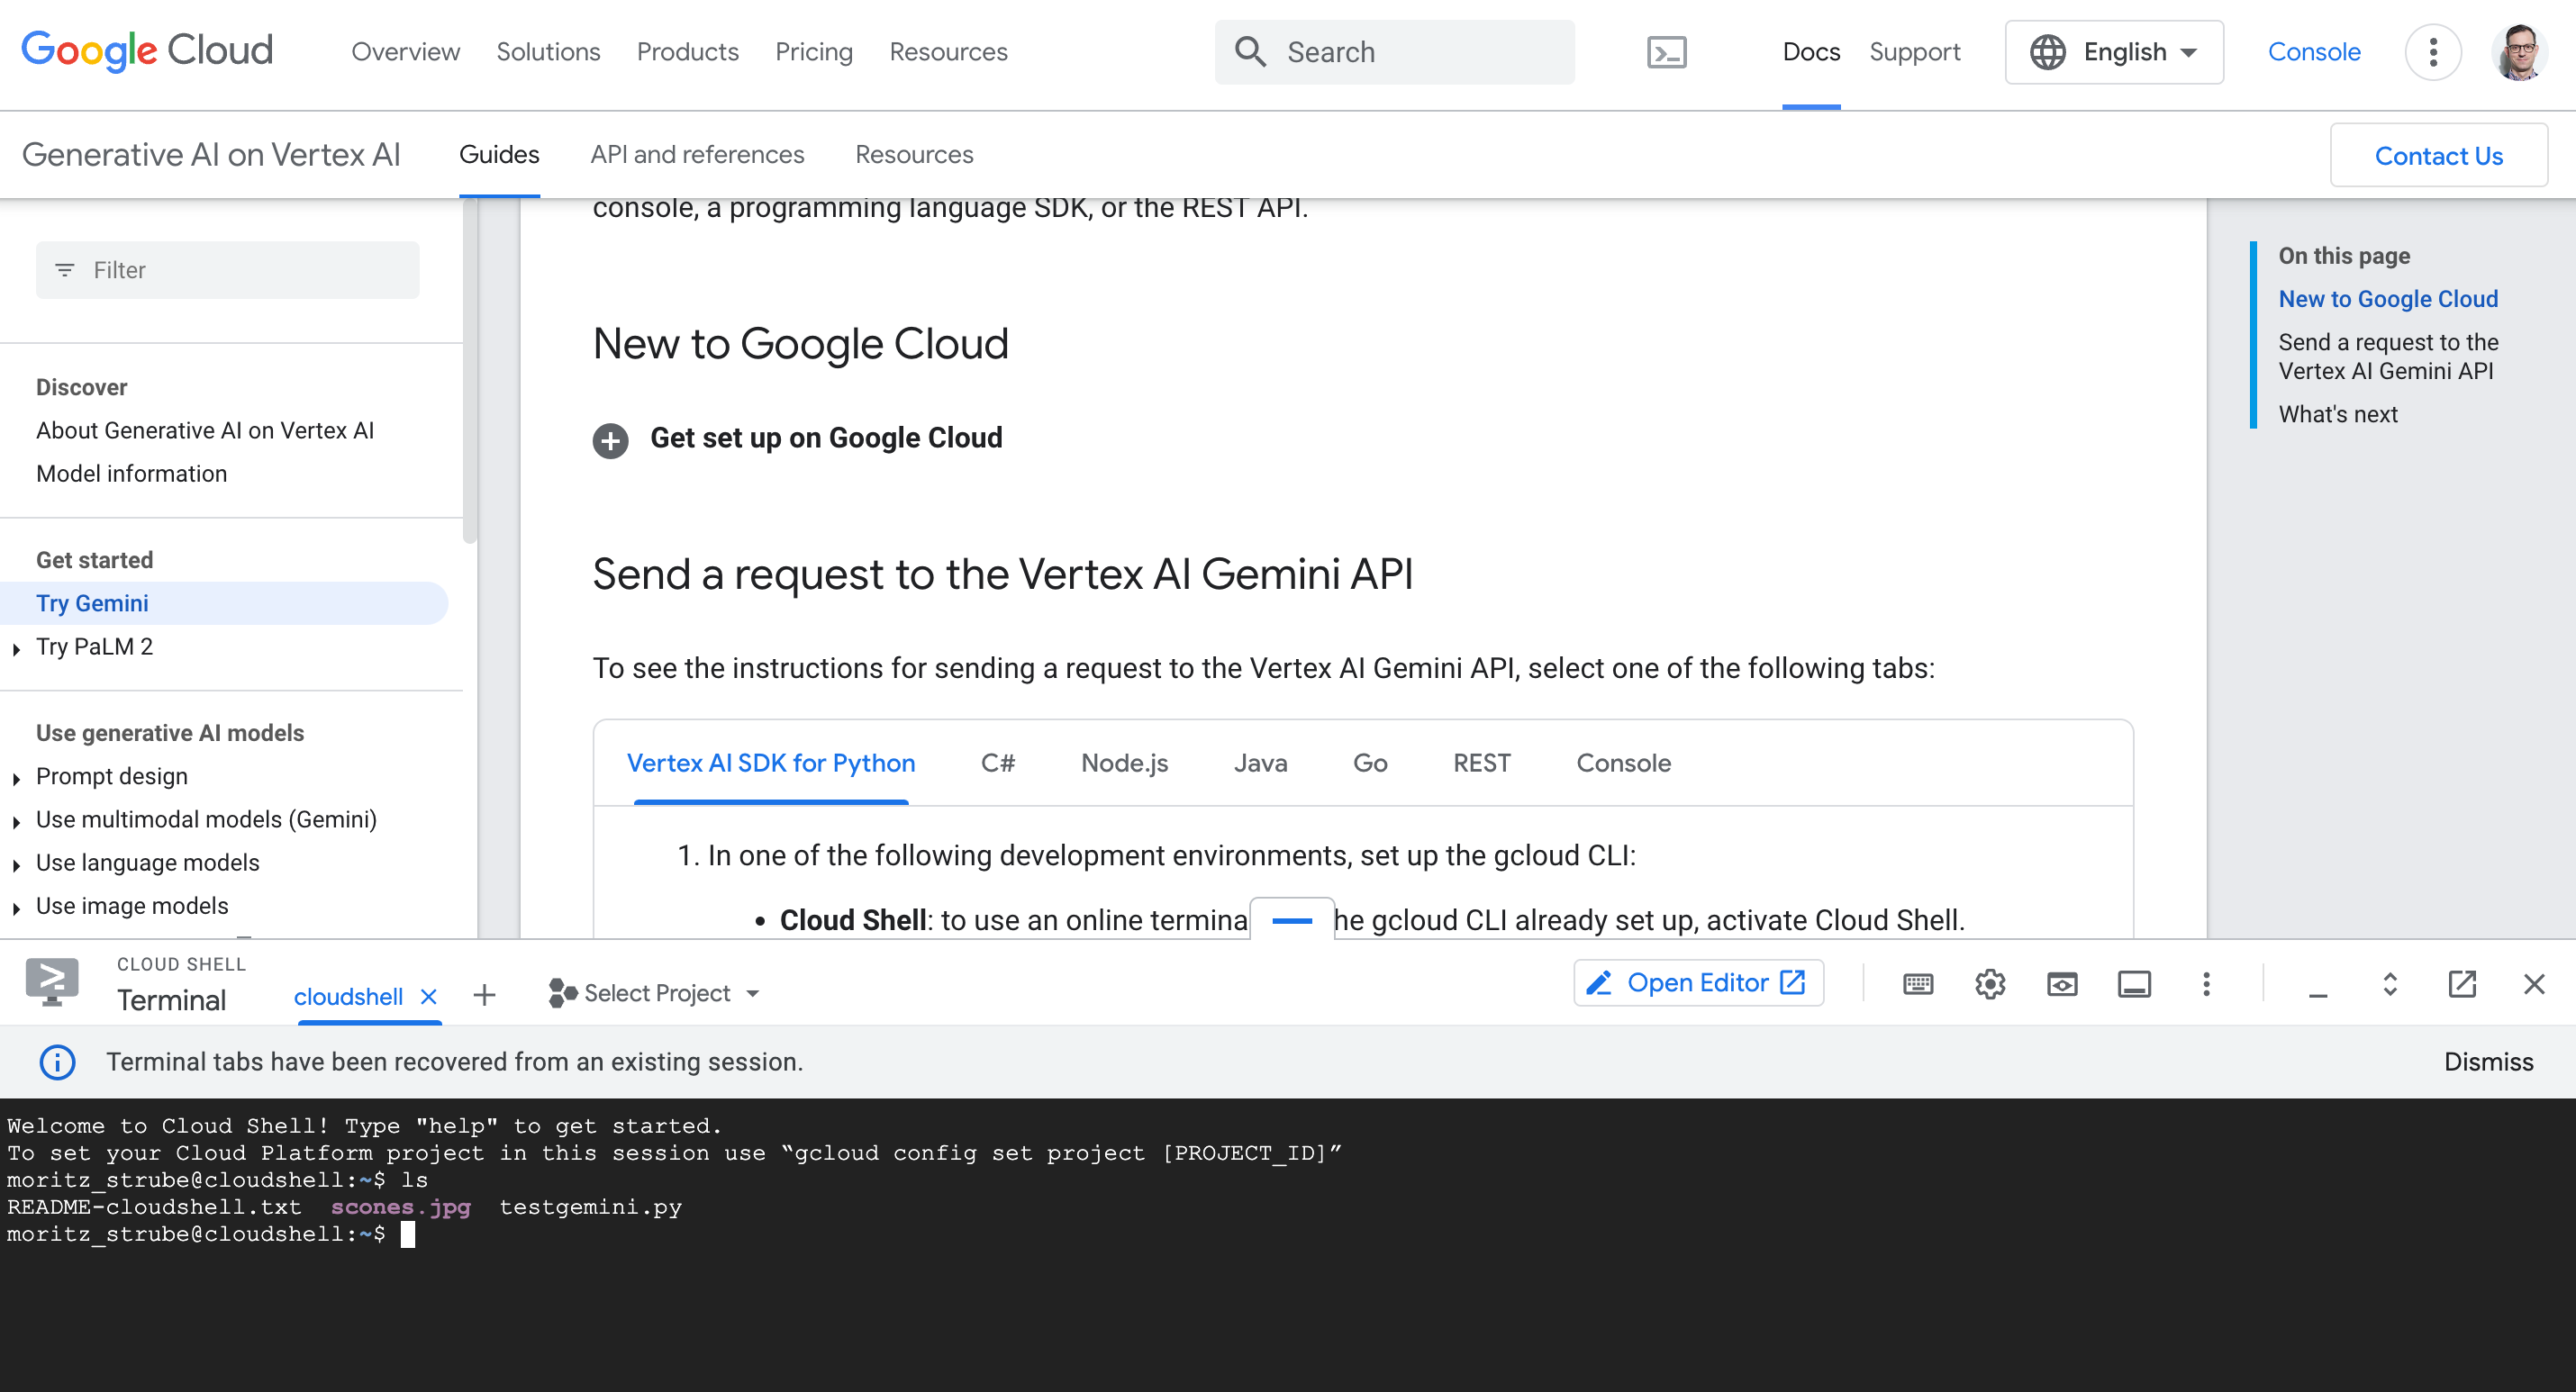
Now install the dependencies using the cloudshell:
pip3 install --upgrade --user google-cloud-aiplatformAuthentication in Cloud Shell is not required, because you are running on a Google Compute Engine virtual machine. The service credentials associated with this virtual machine will be used automatically.
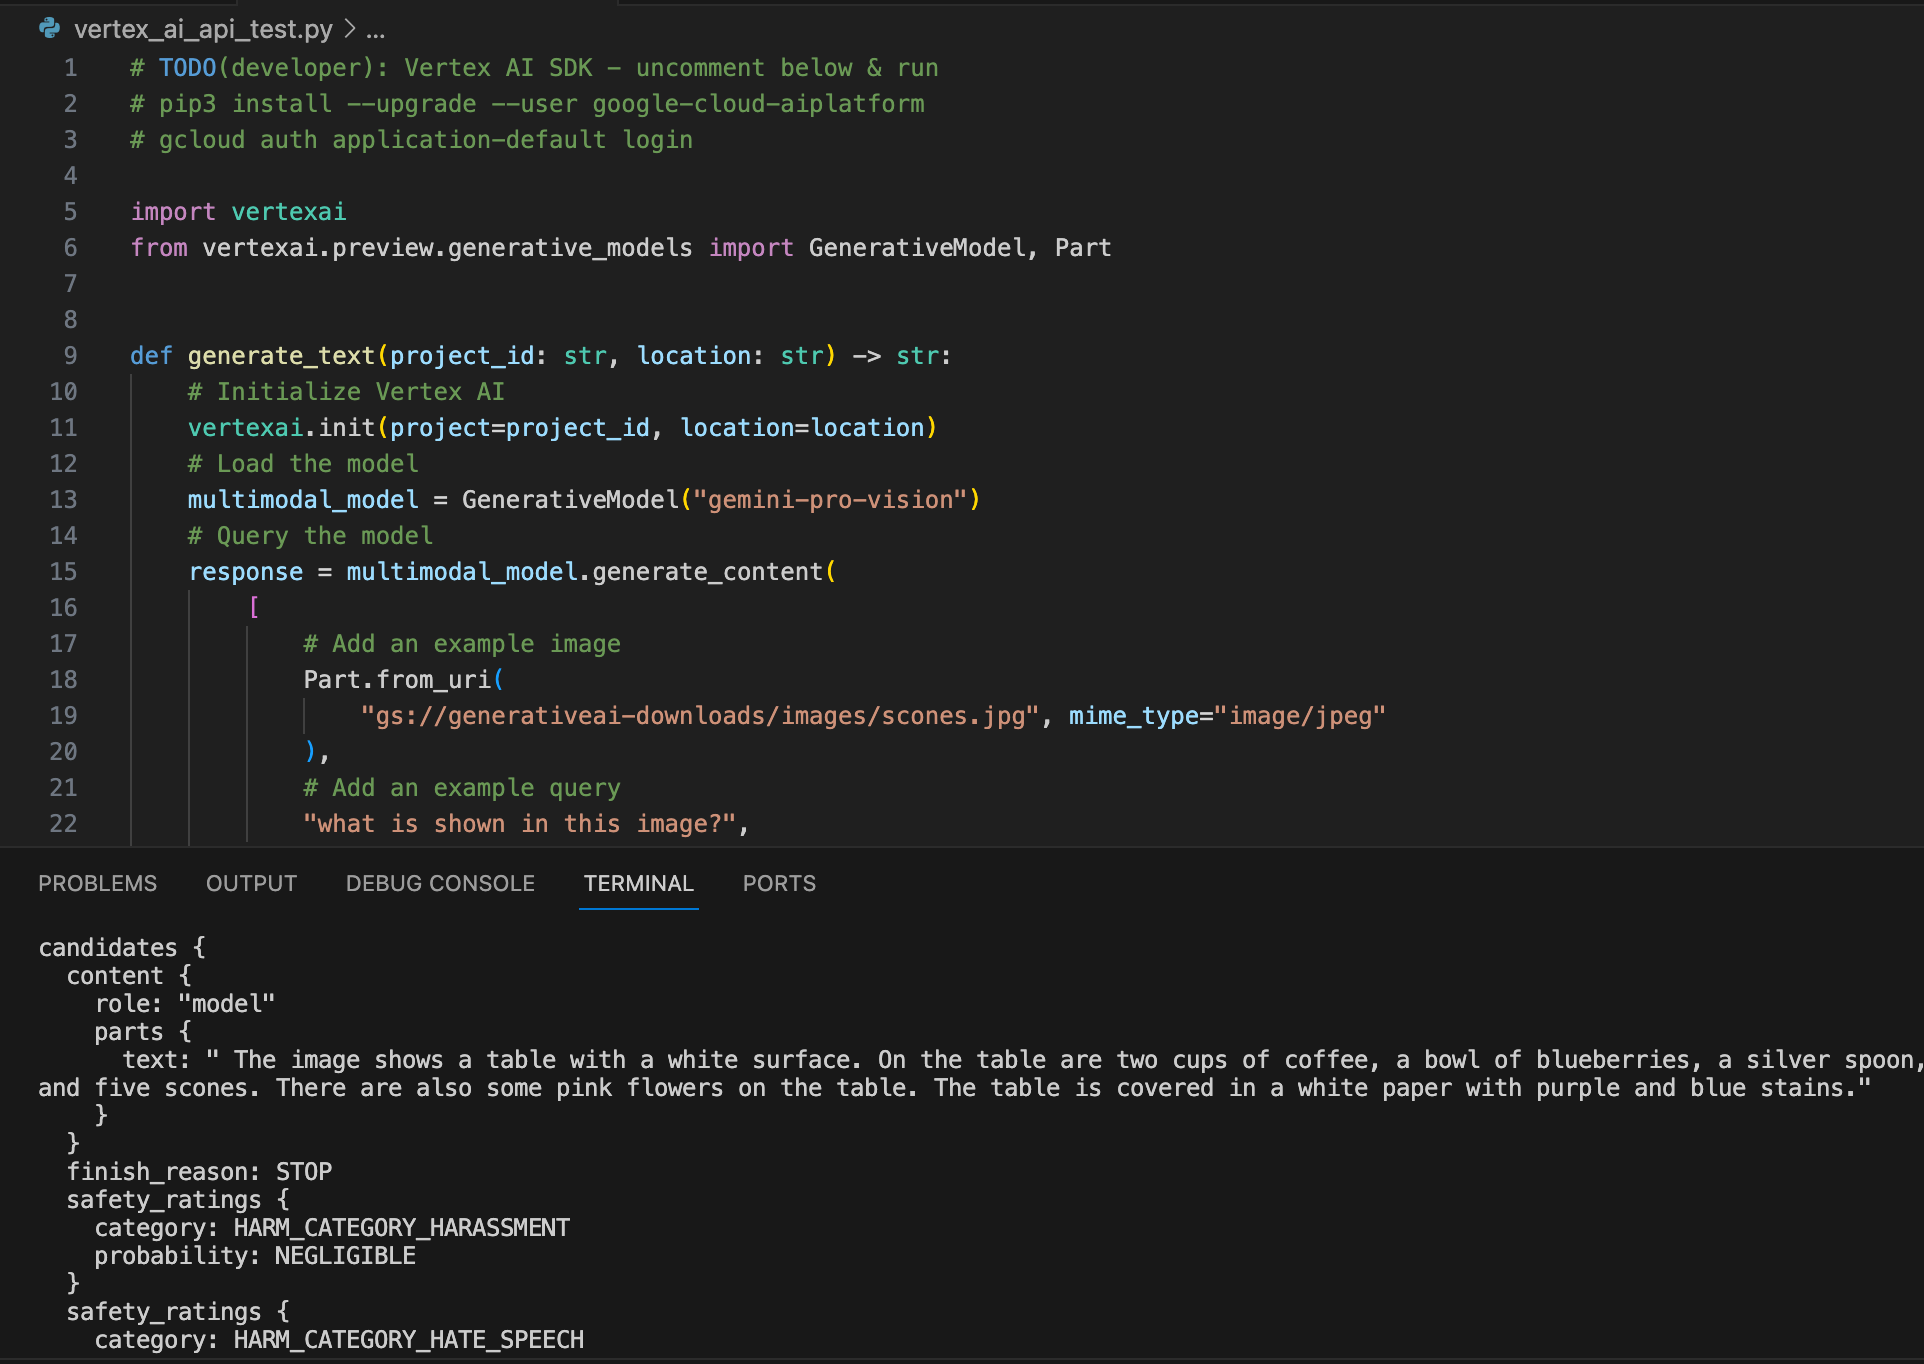
Now click on “Open Editor”. Open the file “testgemini.py” in the Cloud Shell Editor.
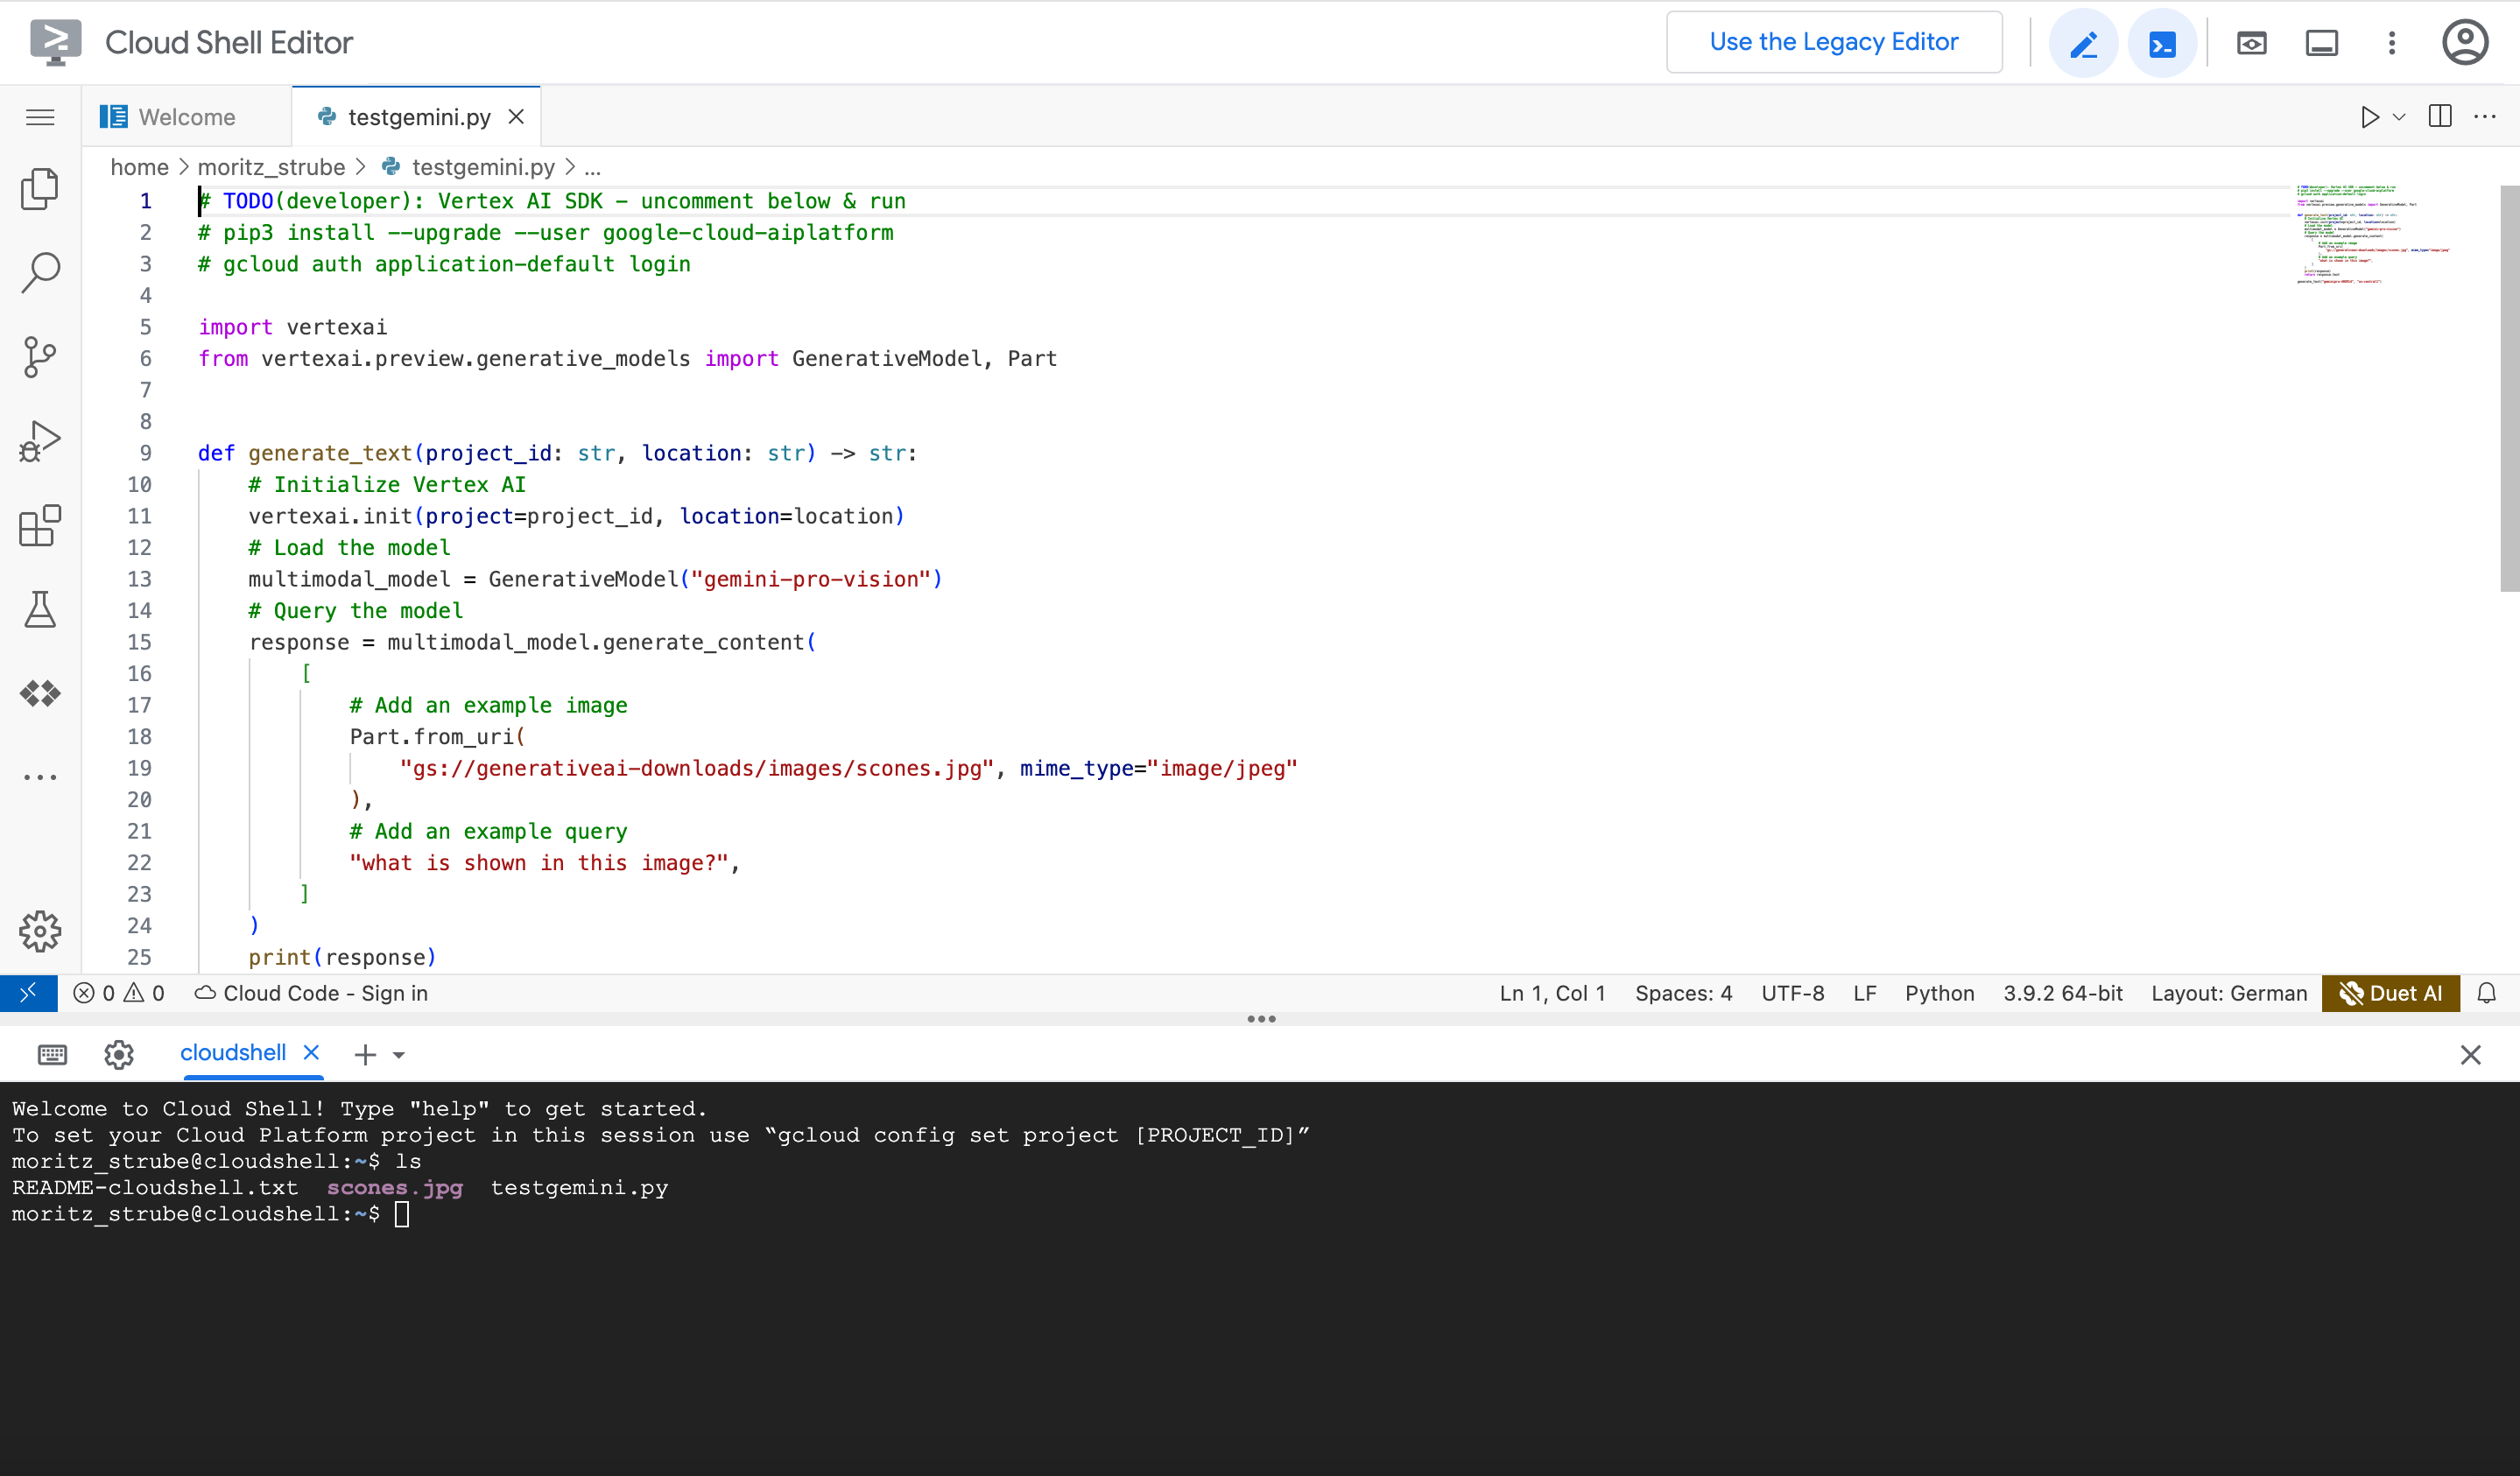
Add the line
generate_text(project_id, location)to the example code with the PROJECT_ID replaced by the the id of the Google cloud project you use. Change the location if necessary or use the default “us-central1”. Now you can run it in the shell:
python testgemini.py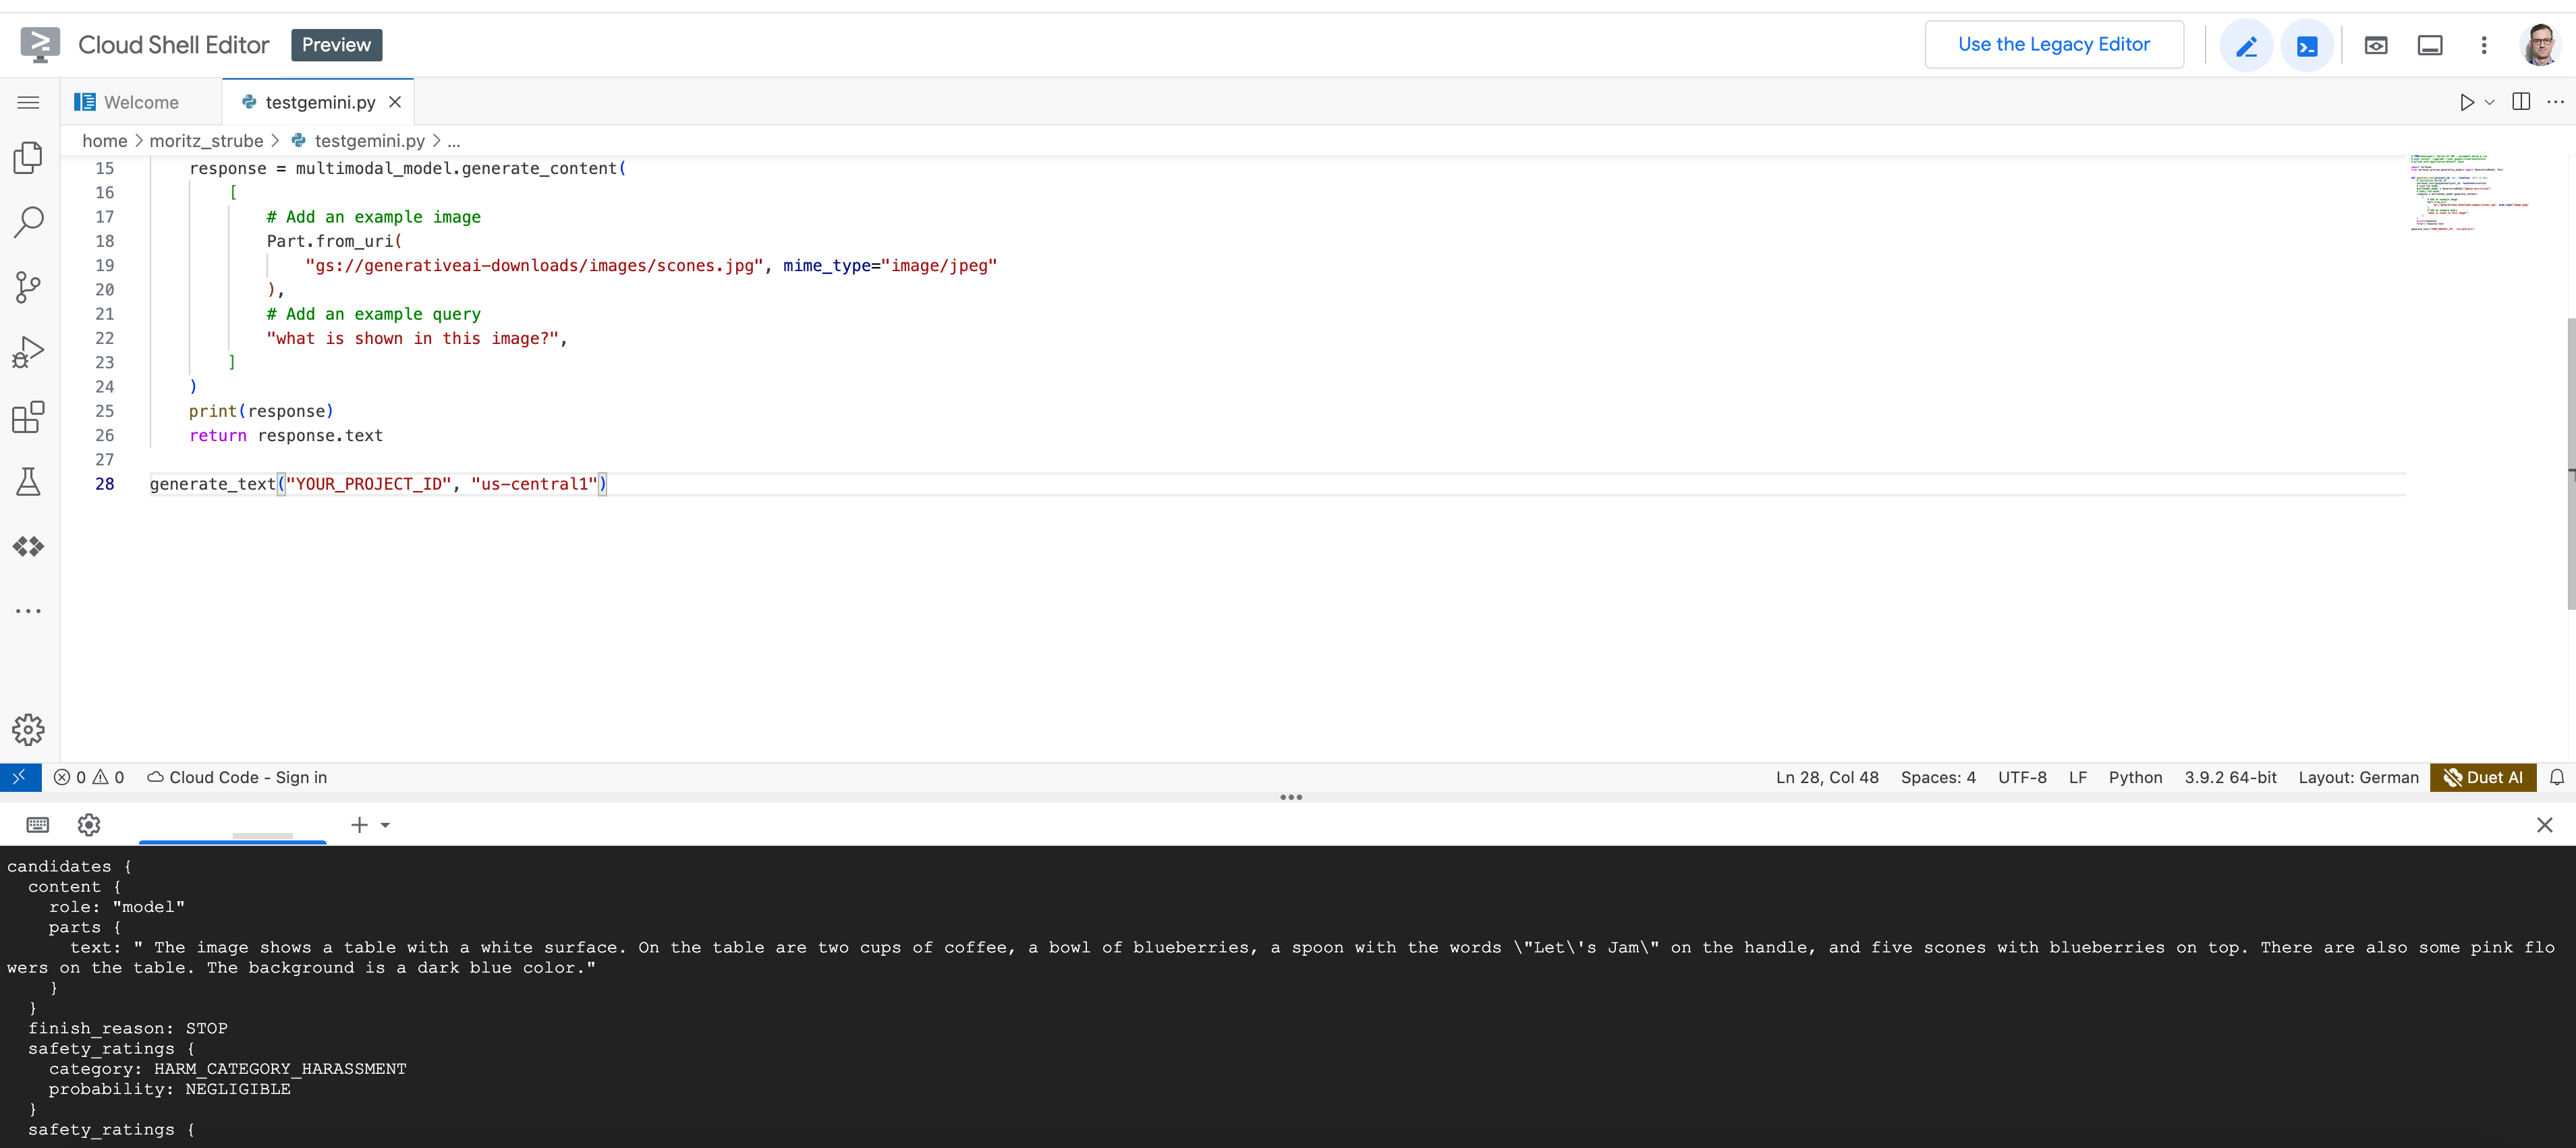
The screenshot above shows the code in the Cloud Shell Editor and the Cloud Shell, after invoking the program.
API call from Colab
Google Colab is a cloud-based platform that allows you to run Python code in your web browser without having to install any software locally. To use Colab to call the API, you will need to authorize the use of your Google account.
To authorize Colab, you'll need to run the following command in your terminal (please note the exclamation mark before gcloud to run a shell command in the cell):
!gcloud auth application-default loginThis command will open a browser window and take you to a Google authentication page. Follow the instructions on the page to sign in to your Google account. Once you've signed in to your Google account, an authorization code is provided. Enter this code in Colab. You'll see a success message that says
Credentials saved to file: [/content/.config/application_default_credentials.json]" This means that Colab has successfully authorized with your Google account.
Now install the dependencies using the cloudshell (please note the exclamation mark before pip3 to run a shell command in the cell):
!pip3 install --upgrade --user google-cloud-aiplatformType your code into a code cell and press the "Run" button. The output of your code will appear below the code cell. You can also run a code cell by pressing Shift+Enter.
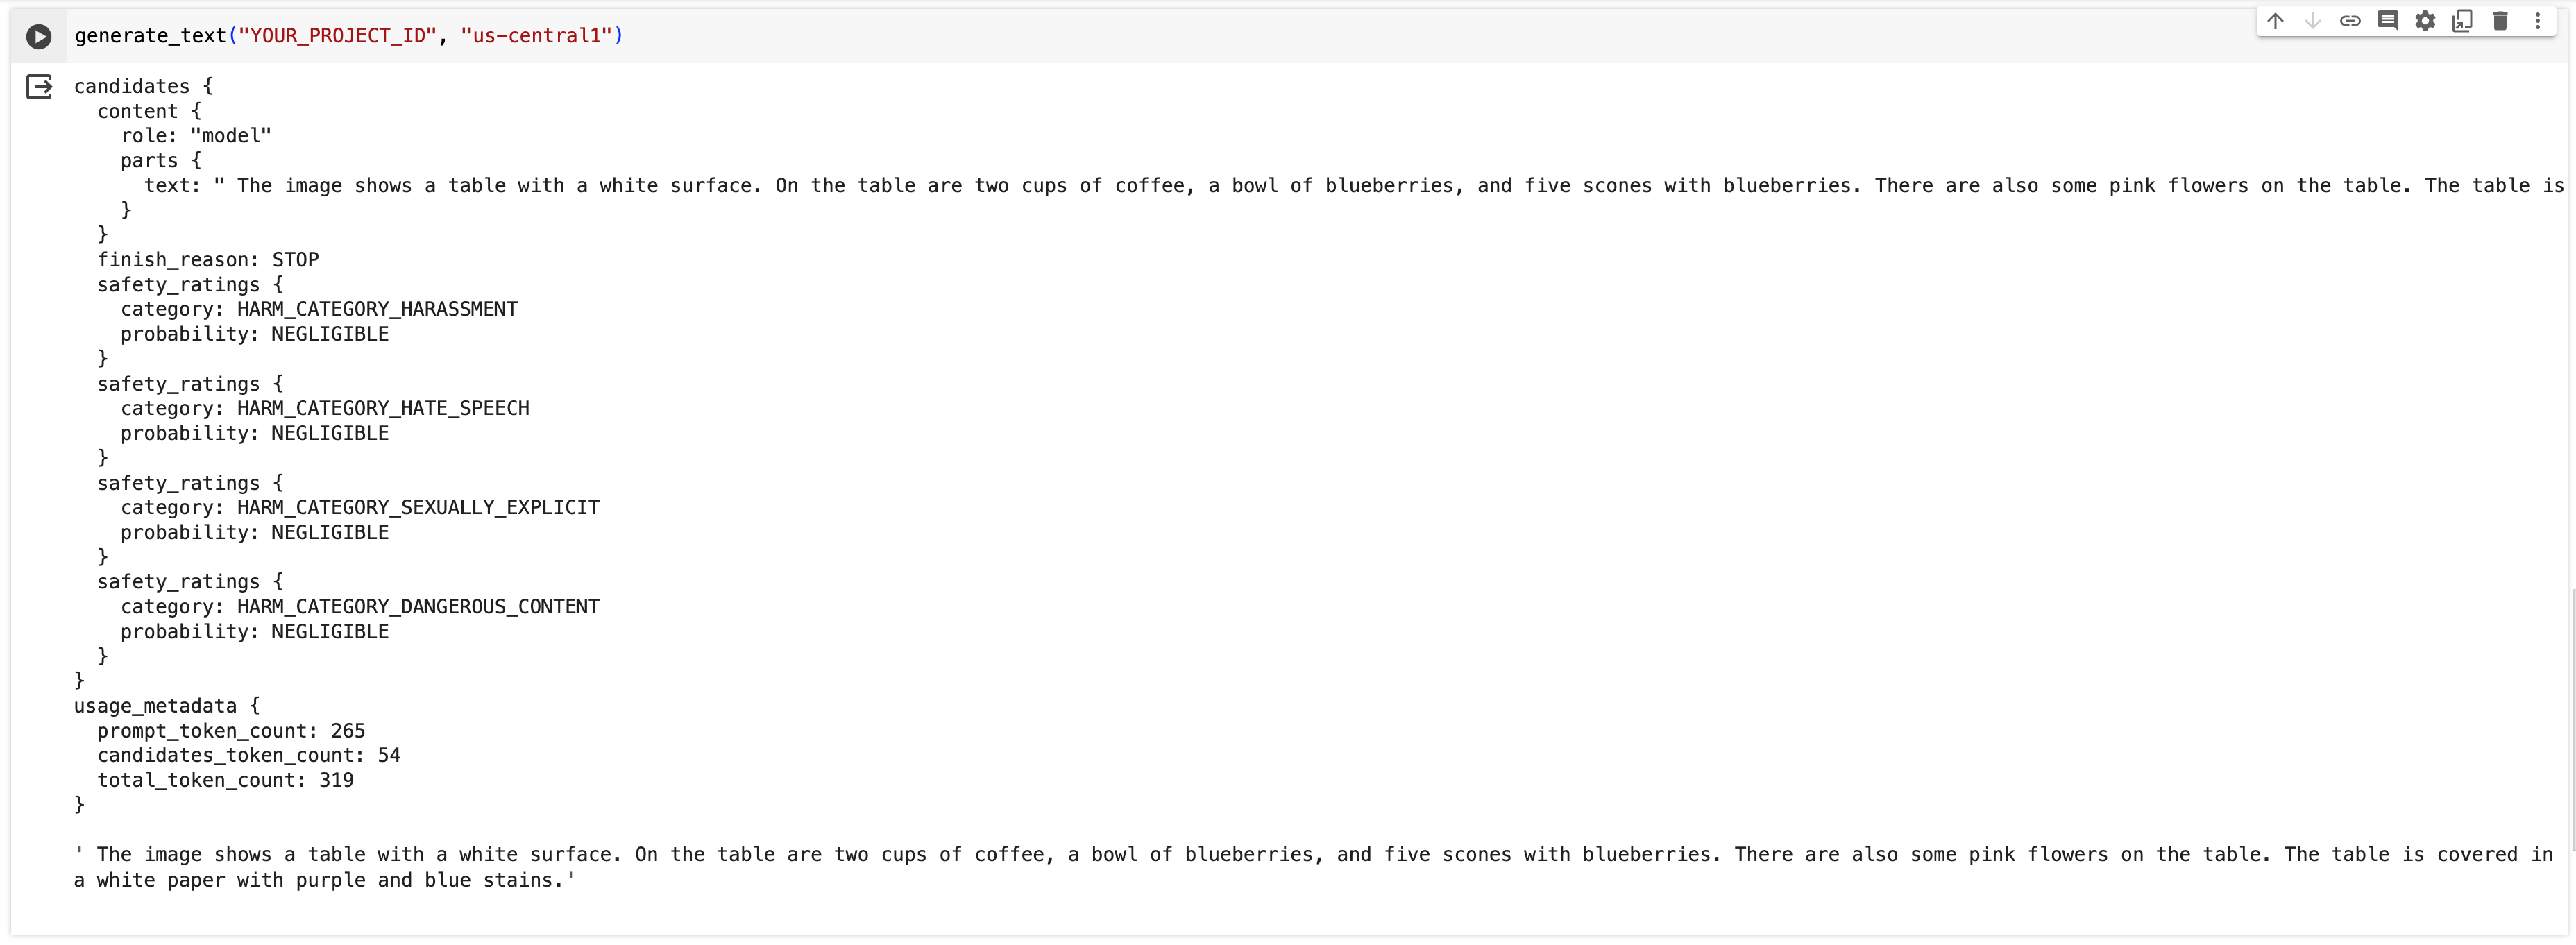
Open a new notebook and copy the code from “testgemini.py” into it and run the code. Add a cell with the function call, insert your Google Cloud project id and run the cell (make sure to insert your PROJECT_ID).
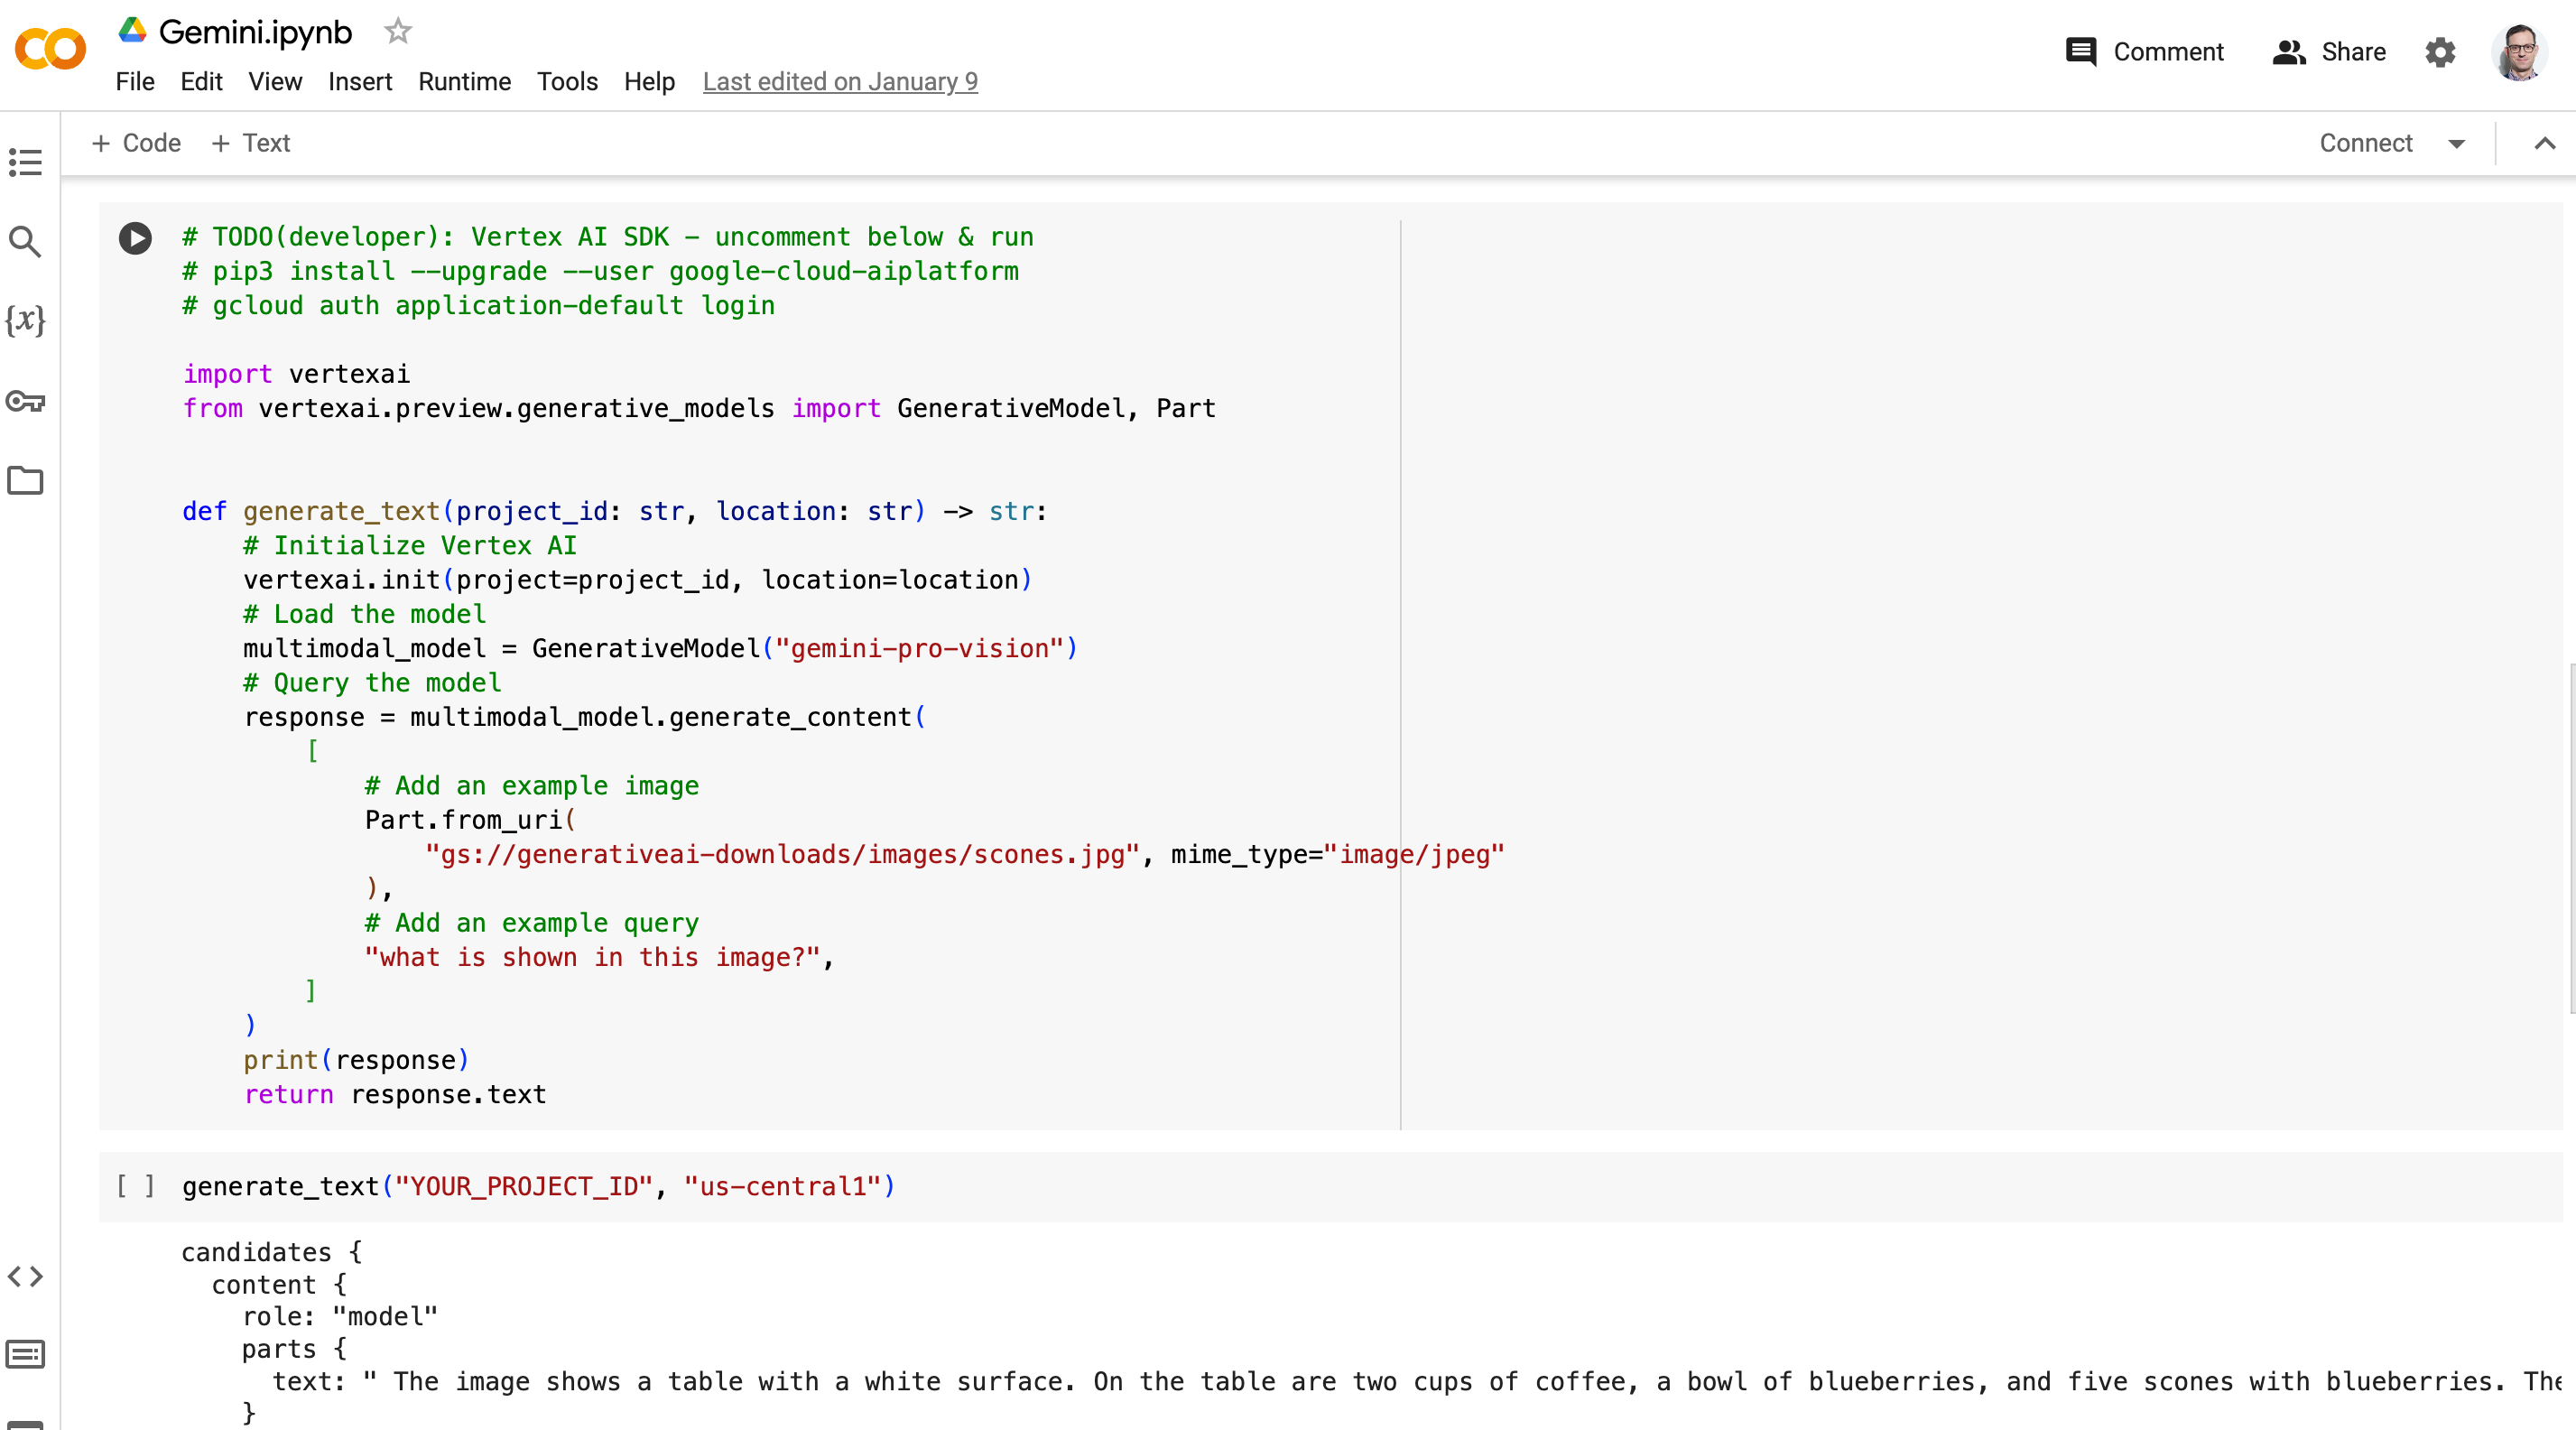
You will get an output similar to this.
API call from local computer
Download the gcloud CLI package from here and unzip it to a convenient location. Execute the install script located within the unzipped package using the command (macOS, fow Windows see the documentation here):
./google-cloud-sdk/install.shFollow the instructions provided in the browser to authorize the gcloud CLI to access your Google account. Once authorization is successful, the credentials for the connected account will be saved to a local file named
$HOME/.config/gcloud/application_default_credentials.jsonNow run the program with the added line and project_id and location replaced by your project id and location.
generate_text(project_id, location)on your local computer.
Conclusion
Gemini Pro, Google's groundbreaking language model, offers a range of access methods to suit diverse user needs and technical expertise. While the simplest and most user-friendly approach is through the web app interface, those seeking greater flexibility and control can opt for the API route. Each method comes with its own set of advantages and considerations.
For those seeking a straightforward and intuitive experience, accessing Gemini Pro through the web app is the recommended choice. This approach seamlessly integrates Gemini Pro's advanced capabilities, allowing users to interact with its powerful features without any prior coding or technical knowledge. Simply visit gemini.google.com and engage Gemini using natural language prompts, unlocking Gemini Pro's capabilities for a wide range of tasks, including creative writing, informative responses, and intelligent discussions.
For developers and experienced users seeking greater flexibility and control over their Gemini Pro interactions, the API-based approach offers a wealth of options. By utilizing the Gemini Pro API, you can directly integrate the model into your applications and workflows, enabling tailored solutions and enhanced performance. However, this route demands a basic understanding of Google Cloud and programming skills to effectively utilize the API's functionalities.
You may be notified that the corresponding API needs to be enabled. Follow the instructions.
You can download the image used in the example with the google cloud CLI (installation instructions):
gcloud storage cp gs://generativeai-downloads/images/scones.jpg .